
Mostrar mensagens com a etiqueta Tutorial. Mostrar todas as mensagens

segunda-feira, 30 de abril de 2012

Bolsa para Kindle / Kindle pocket

Bolsa para Kindle
Foto: @Koio-Ko-Fi

Faz algum tempo que não publico nada. A verdade é que tenho estado a trabalhar em projectos mais demorados (quilts). Hoje decidi colocar os quilts de lado e fazer um projecto simples e útil. Aqui deixo-vos um tutorial de uma bolsa para Kindle.

For some time now I do not publish anything. The truth is that I have been working on long projects and complicated  (quilts). Today I decided to put the quilts away and make a simple and useful project. Here I leave you a Kindle pocket tutorial.

Materiais:
- Tecido exterior (5 1/2" x 14 1/2")
- Forro (5 1/2" x 14 1/2")
- Enchimento (5 1/2" x 14 1/2")
- Tira para fecho (7 1/2" x 1 1/2")
- Fecho magnético

Materials:
 - Outer fabric (5 1/2 "x 14 1/2")
- Lining (5 1/2 "x 14 1/2")
- Volume Interfacing (5 1/2 "x 14 1/2")
- Strap closure (7 1/2 "x 1 1/2")
- Magnetic closure


1- Cortar tecido exterior, forro e enchimento com as medidas indicadas.
1 - Cut outer fabric, lining and volume interfacing with the measures indicated.

Foto: Koio-Ko-Fi
2 - O enchimento que utilizei é termocolante (Vilena H640 7 Fliselina H640). Neste caso deverá colocar-se a parte colante do enchimento com o avesso do tecido exterior e passar a ferro que que a mesma cole ao tecido. Caso não utilize enchimento termocolante passe à fase seguinte.
2 - The fusible  interfacing  that I  used is (Fliselina H640 Vilena H640). In this case you should put the sticky part of the filling with the wrong side of the outer fabric and iron it. If you do not use fusible  interfacing  pass to the next stage.

Enchimento termocolante (Vilena H640 / Fliselina H640)
Foto: @Koio-Ko-Fi
Foto: @Koio-Ko-Fi

3 - Fazer a tira do fecho. Cortar um pedaço do tecido exterior com as medidas 7 1/2" x 1 1/2". Juntar o direito do tecido, dobrar ao meio e centrar o fecho magnético. Coser à volta deixando uma abertura no topo.
3 - Making the strip closure. Cut a piece of outer fabric with the measures 7 1/2 "x 1 1/2". Add the right fabric together, fold in half and center the magnetic closure. Sewing around leaving an opening at the top.
Foto: @Koio-Ko-Fi

4- Colocar os direitos do tecido exterior e do forro juntos e sobrepor o enchimento (caso não tenha utilizado o enchimento termocolante). Numa extremidade colocar a tira do fecho e na outra centrar a outra parte do fecho.
4 - Put the rights sides of the outer fabric and lining together and overlap the interfacing (if you have not used the fusible interfacing ). In one end place of the closure strip and in the other end center the other part of magnetic closure.

Foto: @Koio-Ko-Fi

5- Coser a toda à volta deixando apenas uma abertura para virar do direito.
5 - Sew all around leaving only an opening to turn right.
Foto: @Koio-Ko-Fi
6 - Virar do direito. Coser a abertura deixada. Coser as laterais com ponto cobertor.
6 - Turn right. Sew the opening left. Sew the sides with manual running-stitch.
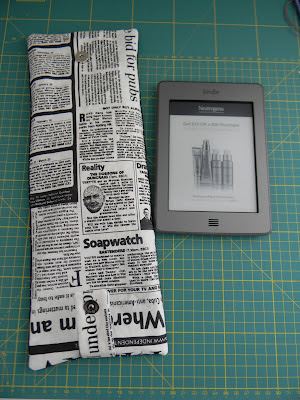
Foto: @Koio-Ko-Fi

Foto: @Koio-Ko-Fi

Foto: @Koio-Ko-Fi


segunda-feira, 19 de março de 2012

Feliz dia do Pai / Happy Father´s Day

Foto: @Koio-Ko-Fi

Comemora-se hoje o dia de S. José, para muitos, dia do Pai. Cá em casa tem sido uma correria...entre fazer bolos, decoração e prendas... as crianças não tem tido mãos a medir!
Uma das coisas que fizemos para assinalar o dia de hoje foi um saco para embrulhar uma garrafa a partir de uma camisa velha. Adivinhem de quem?... Sim... do pai!!
Feliz dia do Pai!

Today is St. Joseph´s Day, and for many, Father´s Day. Here at home we have had a hard work ...between making cakes, decorations and gifts ... children has not stopped!
One of the things we did to celebrate the day was a bag to wrap a bottle from an old shirt. Guess who? ... Yes .. the father!
 Happy Father's day!


1 - Para fazer um saco para embrulhar uma garrafa colocar a manga esticada e medir 40 cm / 15.7 '' a partir do punho.
1 - To make a bag to wrap a bottle put the sleeve stretched and measure 40 cm / 15.7'' from the cuff.

2 - Cortar a manga e virar do aveso.
2 - Cut the sleeve and turn on the wrong side.

3 - Coser o fundo.
3 - Sew the bottom.

4 - Para fazer a base do saco, fazer coincidir a costura do fundo com a lateral por forma a obter um triangulo. Medir 2.5 cm / 1'' e marcar.
4 - For making the bag base, you must match the bottom  seam with the side seam to make a triangle. Measure 2.5 cm / 1'' and mark.

5 - Cosa pela marca em ambos os lados da base do sacos.
5 - Sew by the mark on both sides of the base of the bag.

6 - Cortar os cantos deixando uma margem de 0.5 cm / 1/2 '' depois da linha.
6 - Cut the corners leaving a margin of 0.5 cm / 1/2'' after sewing.
7 - Virar do direito e o saco está pronto a ser utilizado!
7 - Turn right and the bag is ready to be used!


quarta-feira, 29 de fevereiro de 2012

Marcadores de copos / Wine glass markers


Foto: @Koio-Ko-Fi
Há muitos marcadores de copos no mercado... mas por aqui são dificeis de encontrar ou não vou aos sítios certos. Por essa razão resolvi um problema! Fiz eu, de forma simples, os meus marcadores de copos! Pode haver mais bonitos, mais práticos, mais coloridos... mas como estes, calculo que não deve haver!

There are many wine glass markers in the market ... but here are hard to find or I do not go to the right place. For this reason I solved a problem! I did my wine glass markers ! There may be prettier, more practical, more colorful ... but these are only ones... I think !

Foto: @Koio-Ko-Fi

Foto: @Koio-Ko-Fi

Foto: @Koio-Ko-Fi

Foto: @Koio-Ko-Fi

Foto: @Koio-Ko-Fi

Foto: @Koio-Ko-Fi